Quantcast
  1. See Detail

Reverse Osmosis Pre-Filters - 6 Monthly Water Filter Replacement Pack 10" x 2.5" (GT2-2K + GT4-7CTO)

SKU
GT2-2K+GT4-7CTO
In stock
Quick Overview
$35.50
4 Interest Free Payments of $8.88
Wholesale Price Break refresh image
Select Quantity Discount Price per piece
2-9 17% $29.75
10+ 44% $19.95

Reverse Osmosis Water Filter 5 Micron Pre Filters (6 Month Replacement Pack) 10" x 2.5" (GT2-2K + GT4-7CTO)

This is the standard set of pre-filters for all of the following Undersink Reverse Osmosis systems:

Stage 1: 5 Micron Polyspun Sediment Cartridge (GT2-2K) (Replace Every 6 Months)

The first stage is a 5 Micron (uM) Sediment filter composed of 100% melt-blown polypropylene fibre. This cartridge helps to help protect the carbon pre-filters and reverse osmosis membrane from physical damage caused by particulate matter such as sand, dirt, silt, plant spores, and pollen. Physical contaminants such as these (which can surprisingly be found in most municipal water supplies), tend to clog up filter system components causing reduced water flow, lower osmotic pressure, diminished filtration efficiency, and ultimately, inferior water quality.

Stage 2: 5 Micron 100% Coconut Carbon Block Water Filter (GT4-7CTO) (Replace every 6 months)

The second stage is a high-grade activated coconut carbon block pre-filter. The carbon block matrix enables maximum surface area and contact time, taking the first hit to adsorb chemicals such as Chlorine (which causes damage to the membrane), along with other harmful organic chemicals and contaminants. Keeping up with regular maintenance of this pre-filter (changing it every 6 months) is crucial to protecting and extending the life of all filters that come after it.

How often should you change reverse osmosis water filters?
Filter Replacements & Maintenance Schedule

To maintain the optimum level of filtration year-round, and to ensure you get the maximum life out of your RO membrane (the engine room of this system), we strongly recommend a consistent filter maintenance schedule. 

  • Pre-Filters

    Every 6 months you will need to change the pre-filters, which help protect and extend the life of the membrane. Some people neglect to keep up with the maintenance of the pre-filters, thinking that the RO membrane will take care of it! However, the RO membrane is the most delicate and expensive filter within any RO system, so it's worth protecting your investment!


    The pre-filters thus serve the dual purpose of blocking sediment particles larger than 5 microns and removing chlorine, which both cause damage to the inside of the RO membrane in different ways:

    • Sediment particles physically damage the fine internals, causing micro-tears that allow contaminants through to the "clean" side of the osmotic membrane, as well as blocking up the membrane which can cause the system to stop producing water and force an excessive amount of water to waste. 

    • Chlorine that has been dissolved in water creates corrosive hypochlorous and hydrochloric acids, which dissolve the delicate RO membrane (via a process called "ring chlorination" which disrupts the hydrogen bonding between the membrane's polymer matrix) and allows contaminants to pass through to the "clean side". Because this process occurs gradually over time, most people don't notice the taste of contamination until they change their membrane! 

  • Reverse Osmosis Membranes*

Reverse Osmosis membranes filter down to an ultra-fine level of filtration - down to 0.0001 of a micron - which is the reason why RO membranes can filter out minerals, salts, and metals (unlike carbon). Because this level of filtration is so fine, RO membranes do eventually clog up over time. How long you will be able to get out of your RO membrane, depends on the consistency of your membrane pre-filter maintenance, along with the starting quality of your water.

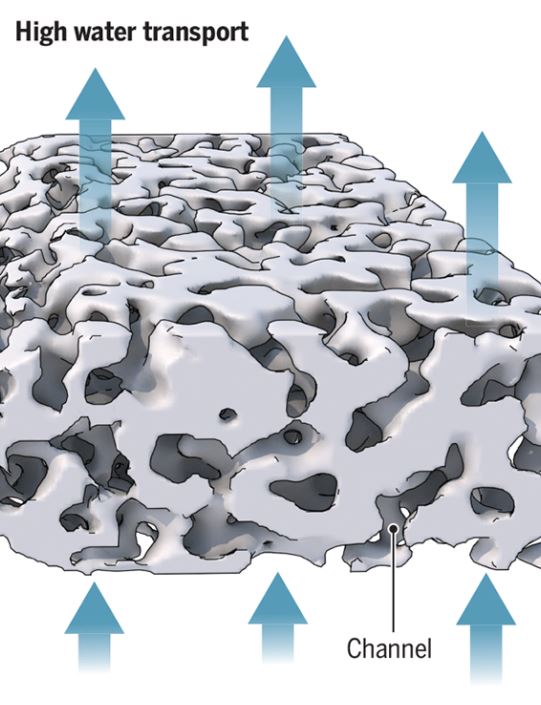
Schematic diagram of the pores in a reverse osmosis membrane.

(Adapted from Geise, G.M., 2021, found in https://www.science.org/doi/10.1126/science.abe9741)

    • HARD WATER (water that is full of salts and minerals) takes a bigger toll on RO membranes than water that is SOFT (water with a low Total Dissolved Solids rating).
    • Western Australia, South Australia, the Northern Territory and Queensland tend to have hard water, along with those whose main source of water comes from a bore.

    • Thus, whilst we have specified a recommended maintenance schedule (below), the quality of the water in the area you live, is ultimately what will determine how long you get out of your RO membrane.

    • *If you are on hard water, at the 2-year mark, simply go for the FULL Replacement Pack (which includes an RO Membrane). Note - cases of extremely hard water may get less than 2 years out of an RO membrane. 

Australian Water Hardness Map Guide

  • Post-Filters

These are all filters that go after the RO membrane to buffer the pH back up from an acidic state to an alkaline state, and "perfect" the water for final consumption. Over the course of a year, the diffusion of the alkalising minerals into the water will significantly diminish, whilst the carbon post-filter will eventually exhaust its capacity to adsorb residuals. 


Please see the Recommended Filter Replacement Schedules (per the above) and links to the replacement filters:

HARD WATER - Recommended Filter Replacement Schedule*

MODERATE/SOFT WATER - Recommended Filter Replacement Schedule


Instructions for Changing your Filters at Home:

Recommended Tools Required:

  • Housing Opening Spanner (You should already have this as supplied with your system, but if not you can purchase one in the drop-down box in this listing).

Before changing filters, we recommend taking a photo of the system from various angles, then one by one, changing the cartridges. This will help you remember the orientation and flow direction of the filters and will save you time as opposed to trying to put the filter back together from scratch.

  • Shutting off the water: There are 3 things you need to do in this step.

    • Firstly, locate your inlet tee valve which connects water to your system, and shut this off by turning the tap 90°.

    • Secondly, you will need to shut off the storage tank valve located on top of the storage tank.

    • Finally, to relieve pressure in the system, open the drinking water faucet tap on the sink.

  • Using Push-Fit Connections: These connections are very easy to use however if you have not used them before, they may be a little tricky at first. To remove the tubing, depress the floating collet, then pull on the tubing and it should release. When re-installing, you need to firmly push the tubing into the opening until you feel a “click” which signifies that the tubing has pushed through the internal O-ring and is seated correctly. If leaking occurs, it may be due to roughly cut tubing OR the tubing is not pushed in far enough.
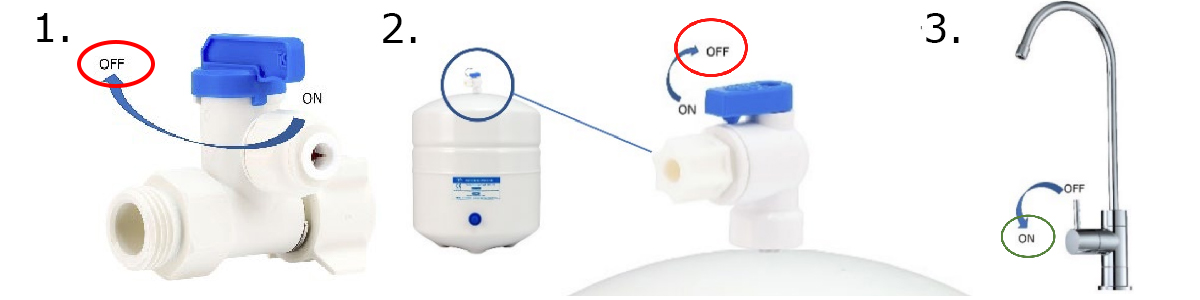
  • Disconnecting the System: To make things easier, we recommend disconnecting the system and performing the filter change over the sink, rather than trying to do the filter change in a hard-to-reach place such as under the sink. We also recommend laying down some towels to mop up dripping water from the lines when you disconnect the system. The four points you need to disconnect are:

    • 1. The Storage Tank at point 12 (we recommend detaching this via the tee fitting connected to the T300 Hydrogen Rich Filter);

    • 2. The Inlet Water at point 4A (this should be disconnected at the inlet to the system ie. the elbow plugged into the Stage 1 Dirt/Sediment Filter);

    • 3. The Drain Line at point 10 (leave the Flow 200 Flow Restrictor connected to the RO membrane by the black tube in its original position), and finally;

    • 4. The Carbon Post-Filter at point 4C (disconnect tubing from the last inline carbon post-filter, which leads to the faucet tap).

      When this has been completed, you can then remove the system from under the sink and begin servicing it on the sink.


  • Changing The Pre-Filters - Stages 1 & 2: NOTE: the housings may be full of water so make sure you do this over the sink. When removing the bottom housings, you may find that they are very firmly tightened, so you may have some difficulty opening them, which is normal for water filter housings. We find the most effective way of removing the housings is to lay the system flat on its back and position the opening spanner around the housing. Using the ball of your hand, sharply and firmly hit the spanner (remember: lefty loosey) which will jolt the housing enough to break the suction seal of the O-Rings on the housing cap. Once the housing has come ajar, use the spanner or your hands to unscrew the housing completely. Remove the old cartridges and discard them (unfortunately they are not recyclable). If you would like to wash the housing out, we recommend using warm soapy water. Ensure you rinse thoroughly before re-installing the housings. If the o-rings require re-lubrication, use only a food-grade silicone-based lubricant, and only a small amount. When loading the new filter cartridges into the filter housing, unwrap them but ensure you handle the cartridges with minimal contact, especially the carbon filter (only handle these cartridges by the plastic end caps to prevent the carbon from absorbing residual odours or bacteria off your hands). When you go to do the housings back up, ensure they are in a vertical position, which will allow the filters to slot into the centre ports without damaging the inner port of the cartridges. Hand tightening is all that is required for the housings to seal correctly (see below). If you are unable to achieve a water-tight seal, you can use the opening handle to 'nip up' the last part, ensuring not to overtighten.

  • Re-Connecting the System: Before re-installing the system double-check over your work to ensure all fittings are installed correctly and that all tubing is correctly aligned and firmly pushed in. Re-position the system under the sink and then re-connect the tubing (inlet water, storage tank, drain line, and faucet tap). Once you have plugged the system back in, ensure all tubing is in the correct place and pushed firmly into the fittings so that they don't leak.
  • Flushing: With the faucet still open, start by turning on your inlet water only (point 1), which will force water back into the system. You will likely hear some sputtering out the faucet tap while the system purges air. During this period, inspect the filter system and check for leaks. If you find a leak, shut off the water, address the issue and turn the water back on. The water will eventually begin to flow out the tap as a slow trickle, and may notice some black water, which is normal as the filters begin to flush. Once you feel the system has purged most of the air, close the faucet tap, turn the water storage tank on (point 14), then re-open the faucet on the sink and allow all the water to run down the sink, to flush the post filters and clear excess air from the system. Once the system has "run out" of water, turn off the faucet tap, allow the system to re-fill fully (1-2 hours), and empty the tank fully. Repeat this tank flushing process again. If you still have air (which will look like cloudy water but will settle) you may need to run one more tank full of water through the system and then it will be good to go.

    If you run into any issues during this process or would like some help, do not hesitate to give us a call or email us for assistance.
More Information
Type Water Filter

Return Policy

Due to the nature of the products we sell, a strict return policy is in place. We work with food-grade certified materials that must be un-opened and un-used, so as to be able to be re-sold. This policy falls in line with the Australian Consumer Law, which is designed to protect BOTH BUYERS AND SELLERS. 

You may receive a refund or credit of equal amount, less the Restocking/Out-of-Pocket Shipping Expense Fee, if applicable, and any other deductions that are relevant. 

  • 30-Day Returns Policy: Returns will not be accepted without prior approval or after 30 days of the invoice date.

  • Wrongly Purchased Items/Changes of Mind Policy: Wrongly Purchased Items, or Change of Mind Purchases may be returned for a merchandise credit. This applies to, but is not limited to purchases of products that are:
    • The Wrong Size;
    • The Wrong System;
    • The Wrong Replacement Pack;
    • Due to a Change of Mind;
    • Due to Buyer Error, whereby the buyer has failed to conduct proper due diligence (including contacting FSA prior to purchase in order to clarify the relevant technical specifications, compatibility, requirements etc.) to ensure the product purchased from us is the correct product for their requirements.
  • Restocking/Out-of-Pocket Shipping Expense Fees Policy: All returns will incur a 17.5% restocking fee OR an out-of-pocket shipping expense fee, whichever is greater. 
    • This fee is in place to cover the administrative expense incurred in processing the return and/or the out-of-pocket expenses incurred by us in shipping the item to you. FSA may use its discretion to determine the restocking fee. Please note this policy falls in line with the ACL, and is designed to protect us as the seller from losses incurred due to buyer error. This means that you will NOT receive a full refund of the original purchase price - you will bear the cost of shipping the product back to us, and then you will receive a credit equal to the purchase price of the product LESS the Restocking/Out-of-Pocket Shipping Expense Fee. Please refer to our Shipping Policies (below) for further clarification.
    • Low-Value Returns: Please note that with low-value items, sometimes the cost of sending the item back to us may be more expensive to you, than simply keeping the item. For example, let's say you have ordered 3x meters of the wrong-sized tubing for your needs and paid $12.00. If, for example, it cost us $7.69 to send the item to you, and it would cost you $7.69 to send the item back to us, overall you would be $3.38 worse off (due to incurring $7.69 to send the item back to us, and having $7.69 taken out of the credit) than if you had kept the item and re-ordered the correct product for your needs. 

  • Shipping Policies: 
    • Free Shipping Offer: As part of our offer of Free shipping Australia-Wide, FSA reserves the right to select the most cost-effective courier to effect delivery of the product to you. We make no guarantee as to how long an item will take to arrive due to unforeseen circumstances outside of ours/the couriers' control, including but not limited to: Staff Shortages, Supply Chain Demand, Extreme Weather Events etc.
    • Express Shipping Policy: If you require an item on an urgent or Express basis, it is your (the buyer's) responsibility to contact us directly by telephone on [phone removed by eBay] prior to purchase, in order that we may quote you the options available for Express Delivery to your nominated address, and to organise additional payment for this Express Service. Express Shipping is not included in our offer of free shipping - this service will come at an additional cost payable by the buyer. 
    • Late Shipping Policy: Given that we offer the option for customers to organise Express Shipping with us prior to purchase, cancellations or refunds will NOT be issued on the basis of late or delayed shipping where the customer has opted for our Free Shipping offer. If the item (sent via Free Shipping), arrives late and the buyer wishes to return the item on this basis, the buyer will be liable for the cost of returning the product to us and a Restocking/Out-of-Pocket Shipping Expense Fee will be applicable to the return, as per the listed returns policy line items above. The customer will be issued a merchandise credit.
    • Our offer of Free Shipping does not apply to Returns: Whilst we offer Free Shipping, this does not mean that there is no cost to ship the product - obviously, a shipping expense is incurred, and as with all e-commerce operators that offer Free Shipping, the cost of shipping the product from our warehouse to your nominated shipping address is built into the price of the product. The offer of Free Shipping therefore only applies to the act of FSA supplying the product to you, and does not cover the cost of returning the product from the customer to FSA.
    • Returned to Sender Items: In the case of the buyer being unavailable to sign, refusing delivery, or the item being sent back to us for whatever reason, FSA may, at its discretion, pass the cost of the product being Returned to Sender (i.e. being returned back to us), back onto the buyer. Refer to Restocking/Out-of-Pocket Shipping Expense Fees (above).
    • Lost Parcels: If an item is deemed to be LOST IN TRANSIT by the courier, the customer is entitled to a replacement product or refund in line with the ACL. In the case of a replacement product, FSA reserves the right to send the replacement product in line with its Free Shipping offer. If you do require the replacement item urgently, please get in touch with our customer service team directly to organise Express Shipping. 

  • Product Damage & Product Faults: Any damage to products that are not reported to FSA within 48 business hours of receipted delivery is not covered under our transit warranty. Return shipping is to be paid by the buyer to the address provided by FSA. It is recommended that the customer applies a transit warranty to the return freight item/s, in case of damage.
    • Faults: Should the item appear faulty or doesn’t work as described, you must supply written/photographic/video evidence of the fault to us, so that we may assess whether the unit/item must be returned for testing (if requested). If testing is requested, return postage is to be paid by the buyer. 
      • If the unit/item is deemed to be faulty, compensation will be provided for the postage cost (proof of cost required). 
      • If the unit/item is deemed to be in working order and as described, the buyer will be responsible for the cost of return postage of the product from FSA's premises, back to the buyer. 
    • Minor Damage: Any damages (minor, that can be repaired) will incur a fee, that will be deducted from the total refund which will be equal to the cost of the replacement parts (List Price) and labour charges (if applicable) to repair the system(s). This will be separate from the Restocking/Out-of-Pocket Shipping Expense Fees.
    • Major Damage: Any damage considered to be major and not feasible for repair may be refused and the return request will be void. The customer will be responsible for the return freight or disposal of the damaged unit.

Returns are not accepted on special order items unless the manufacturer allows it. Applicable fees will apply.

If you have any questions about our return policy, please contact us before purchasing. This will also help to ensure you purchase the correct product that suits your requirements.

apex-logo
jg-logo
pentak-logo
Haycarb-logo
omnipure-logo
uvg-logo
pure-lite-logo
Hydrasil-logo
Blue-logo
Molytec-logo
FSA-de-min-logo
THERMAX-logo